For some people, organization comes naturally. These individuals need to keep their desk or workspace organized at all times. For others, organization is never felt as a need. The desks of these people are usually covered with papers, files, desktop and telephone cords, and office supplies.
These are two types of extremes at each end of the spectrum. The remaining majority are between these two extremes. These are usually people who want to keep their desk organized to maximize productivity, but have a hard time sustaining it. If you are one of those people, this blog will give you tips on how to organize your physical and digital work desk.
Layout Based on Your Workflow
Your work desk functions as your command center. This is where you spend most of your work time and produce valuable output. The layout of your desk is extremely important because it affects your productivity. An organized desk is not a desk with the most little number of items, but a desk that has a systematic layout that is designed based on the workflow of the individual. To create a productive layout, your work desk has to be segregated into different spaces that have specific purposes. Below is an image of a work desk layout based on a common workflow that requires the individual to work with digital and physical tools.
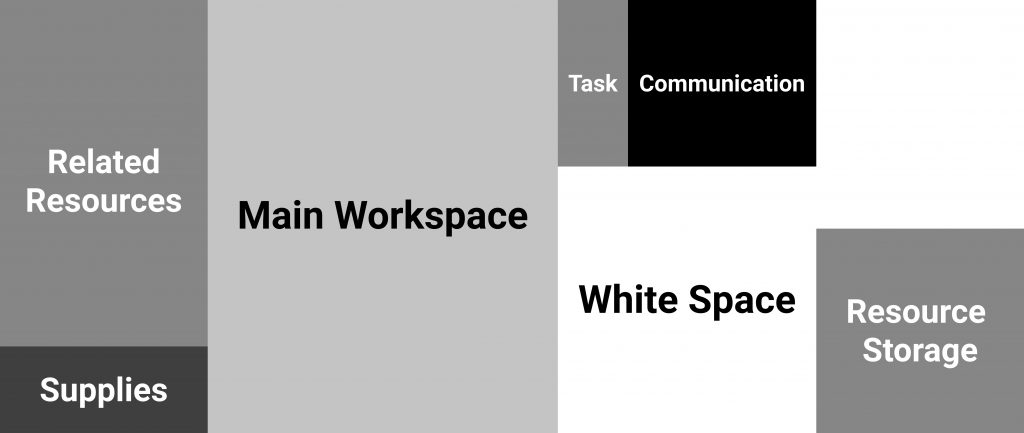
Functions of Each Space
- Related Resources – A space where you keep physical resources that are related to the current task you are working on. Physical resources include files, reports, books, etc.
- Main Workspace – A space where the actual output is created. Since most outputs are created digitally these days, your laptop or desktop computer would be placed in this space.
- White Space – A space that is on your dominant side that can be used flexibly. For example, you can place a certain file that you are referring to in this space.
- Task – A space where you place items that are related to keeping you on track. This can be a calendar or post-it memos that have your daily tasks written down on. This area can be used in various ways depending on how you work as long as it functions as a task management space.
- Supplies – A space where you place office supplies needed to accomplish the current task. This can be pens, highlighters, etc.
- Resource Storage – A space where you keep all your resources. This should be physically separated from the surface of your work desk, such as a separate drawer. The resources in this space should be organized based on tasks or projects.
Each space in the layout recommended above has a specific purpose. This is the most important factor that determines if your work desk is organized or unorganized. The layout above fits the general workflow and as well as how the brain functions.
Figuring Out What You Need
Tip 1: Figure out what you need to accomplish your designated task.
The human brain is unable to handle multiple tasks at once. Multitasking tends to reduce efficiency and effectivity. This is why it is important to first, determine what task you will be working on and second, what are the essential resources and supplies needed to accomplish the task.
Once you find everything you need, place the essential resources in the related resources space and the essential supplies in the supplies space. Anything not related to the current task should not be on your work desk, but stored in your resource storage space. This decreases the chances of you being distracted and keeps you focused on completing the current task.
You can read more about improving concentration and focus here.
Effective Use of the “White Space”
Tip 2: Limit the number of items being place in the white space to one at all times.
The white space is a section in your desk where you should be able to use flexibly, but that does not mean the purpose of the space should change flexibly as well. The purpose of this space is to place a resource that you are currently using or referencing. You should only have one item on the white space at all times because as mentioned above, multitasking does not improve your productivity.
They way the white space should be used is by continuously swapping items between the white space and related resources space. For example, if you are referencing report A, report B, and report C while you are working on a powerpoint presentation on your Main Workspace, you should only have one of the three reports in the White Space at a time. If you are currently referencing report A, report B and C should be placed in the related resources space. Once you are done with report A, you can switch its position with report B or C, depending on the next resource you need to reference.
Reading, highlighting, analyzing, and any other form of digestion of information in resources should be done in the white space.
Systematically Organized Resource Storage
Tip 3: The resource storage space should be systematically organized with an effective filing system.
Your resource storage space contains the most amount of information amongst the different sections of your work desk. As the amount of information increases, the importance of organization increases as well. The resource storage space is simply your personal library and mainly contains resources that you previously used. The main objective of organizing this space is to enable you to find files and resources conveniently when you need to share or reuse them.
Resources stored in this space should be initially arranged into projects. However, one default project that everyone should have is an uncategorized project. This is a project where you can store resources without categorizing them into specific projects. The uncategorized project becomes useful whenever you receive new resources from team members when you are focusing on a specific task. Having to go through the information, digest it, and decide which project it will be categorized into causes you to lose focus and decrease your productivity. It is best to simply initially store it in the uncategorized project, then categorize them before you end work.
It is important to empty your uncategorized project at the end of day as a daily routine to prevent resources to pile up, eventually becoming unorganized (which is contradictory to the whole purpose of this blog).
Lastly, within projects, sub-projects are used to create more specific collections fo resources that are related to each other. At the end of work, other than the uncategorized project, the resources in the related resources space should be organized into their respective projects as well. This allows your desk to be ready for the next task you will be focusing on.
Read more about organizing files the right way.
Organizing Your Digital Workspace
Today, majority of work is done on your laptop and desktop computer. There is a high chance that a digital device will occupy the main workspace above. However, people are having a hard time organizing their digital files and resource more and more as the amount of digital information increases. This is why the work desk layout recommended should be applies to your digital workspace as well. It is universal.
Typed, your easy-to-use organized workspace, is a web application that allows you to manage your digital files and work in the same process as your physical work desk.
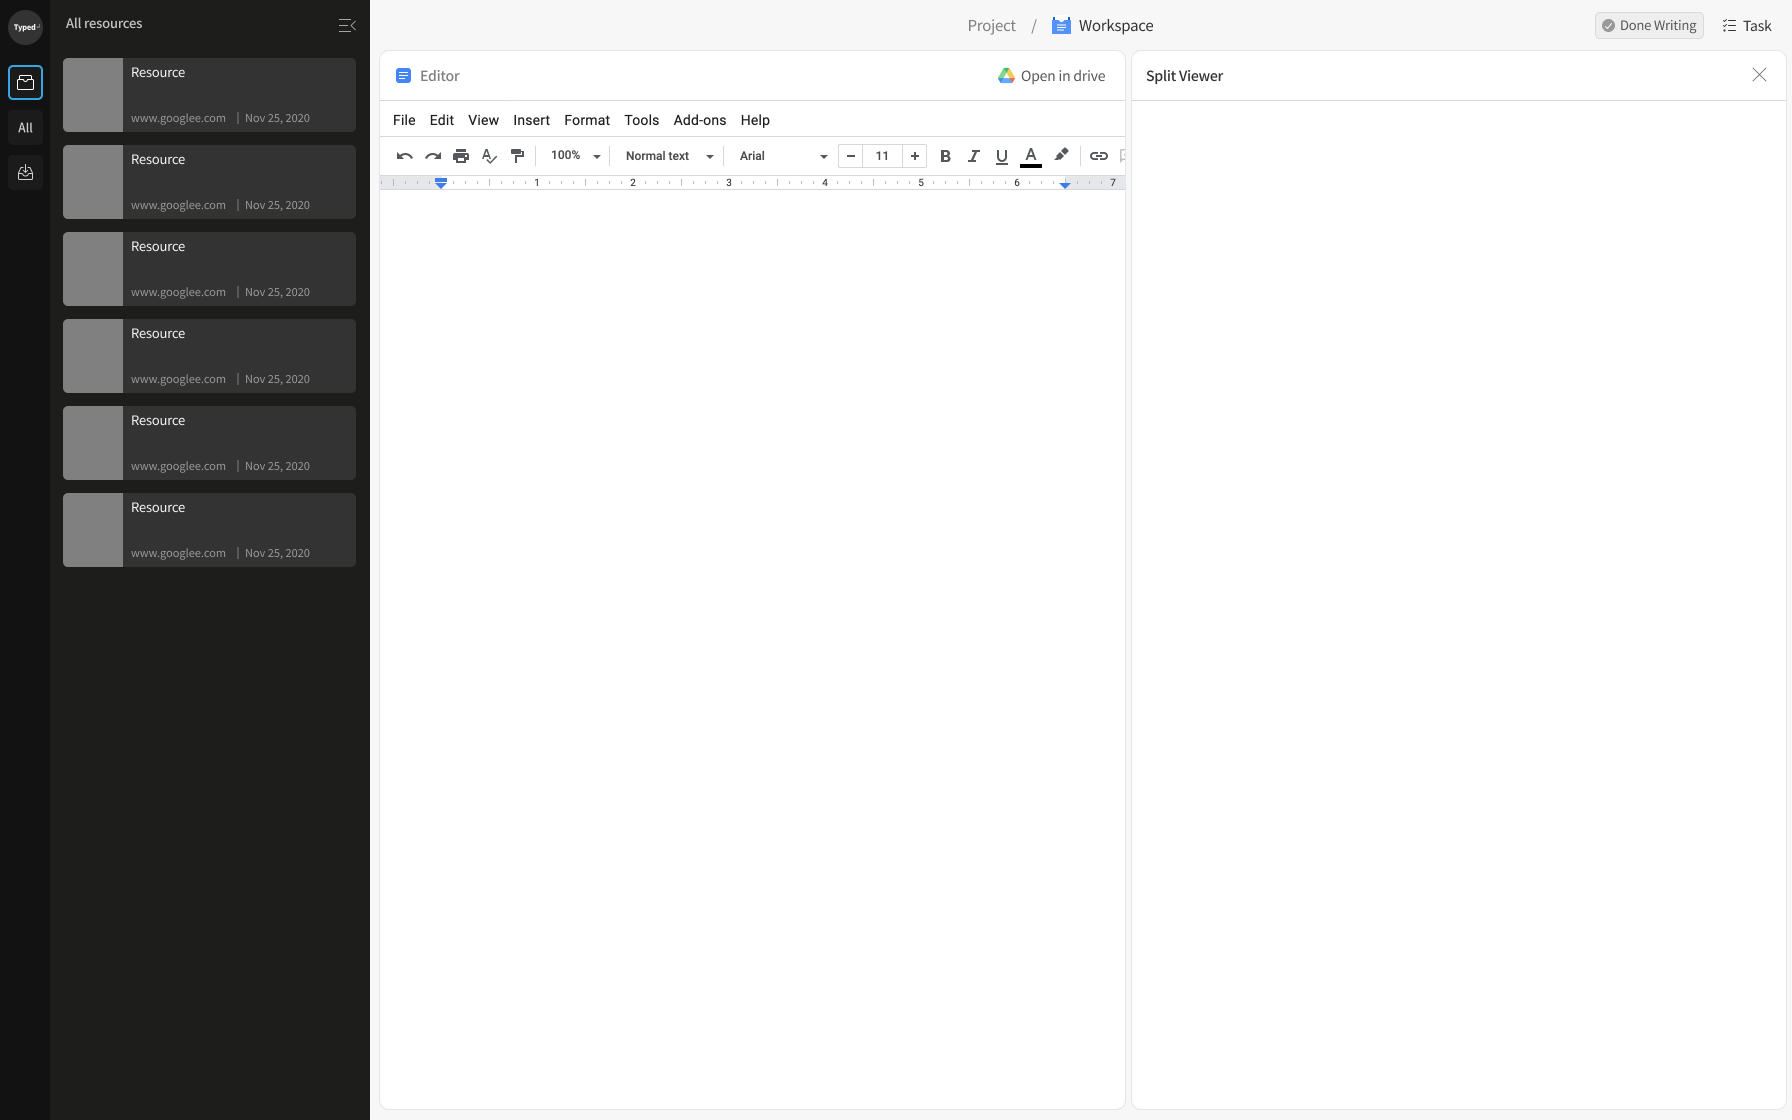 This is Typed’s workspace. It is divided into three main sections. The resource library(dark panel on the left), editor(section in the middle), and split viewer(section on the right).
Functions of Each Section
- Resource Library – This is a panel where you can collect and organize digital resources that are related to the current task you are working on. This has the same function as the related resources space.
- Editor – This is the section where the editor (Google docs, slides, or sheets) you are working on occupies. It is placed in the middle because it it the main task that you are working on. This has the same function as the main workspace.
- Split Viewer – This is the section where you are able to view your resources collected in your resource library. All types of resources are viewed here, from URL web pages to PDF files. This allows you to switch the resource you are referencing easily without losing focus. This has the same function as the white space.
An additional section that is not shown in the image above is the all resource library(can be seen on the left sidebar). This allows you to view all your other documents and their related resources without having to leave your current document. This has the same function as your resource storage.
Now, all that’s left for you to do is organize your physical work desk and let Typed organize your digital work desk, maximizing your productivity to the moon!